Find your way around Wowza ClearCaster Manager
- William Lee
- Apr 22, 2019
- 6 min read

Updated: Mar 25, 2021
#Wowza #ClearCaster™ Manager enables you to easily configure, manage, and monitor Wowza ClearCaster appliance, live stream broadcasts, and simulcast broadcasts. This article introduces the different parts of the #Wowza #ClearCaster Manager browser-based application to help you find your way around the user interface.
Get started
Before you can do much with Wowza ClearCaster Manager, you must set up your ClearCaster appliance, register it with your Wowza™ account, and pair it with a #Facebook account.
To access Wowza ClearCaster Manager, go to clearcaster.wowza.com and sign in with your Wowza account.
Navigate Wowza ClearCaster

1. Click the tabs on the menu bar to access features that help you manage your ClearCaster appliances (the ClearCasters tab), live stream broadcasts (the Broadcasts tab), and simulcast targets for simultaneously broadcasting to Facebook Live and Wowza Streaming Cloud™ (the Simulcast tab).
2. Click Account to sign in or out of your Wowza and Facebook accounts and manage support contacts associated with the Wowza account. Click Support to see a list of video and documentation resources as well as contact information for Wowza Support.

1. Use the ClearCasters tab to access a list of Wowza ClearCaster appliances registered to your Wowza account. From this page, you can configure and manage the associated ClearCaster appliances.
2. View a quick summary of each ClearCaster appliance for which your Wowza account has admin access. In this view, you can pair and unpair Facebook accounts and see whether the appliance is currently publishing a live stream broadcast, if it's associated with a broadcast in preview, or if the appliance is off-air. You can also configure appliance-level broadcast settings (Settings), access additional information about the ClearCaster appliance (Info), and view stream health metrics when a broadcast is live or in preview (Monitoring). Additionally, if the ClearCaster is associated with a broadcast, a link to the broadcast is provided.
3. Activate new Wowza ClearCaster appliance and associate them with your Wowza account.
View appliance information
The Info dialog is always available for all ClearCasters with Admin Access.

The Info dialog displays information about the ClearCaster appliance, software version, network addresses, and status. You can also Send Logs to Wowza support if you need assistance.

View stream health data
The Monitoring dialog is only available when the ClearCaster is associated with a broadcast and has a live video source connected.

The Monitoring dialog displays information about the live source that is connected to the ClearCaster appliance.

Configure appliance settings
The Settings dialog is only available if the ClearCaster is powered on.

The settings configured in the Settings dialog are applied to all broadcasts.

1. Name the ClearCaster appliance. Make sure to click Save before clicking OK, or the name won't be applied.
2. Configure the ClearCaster appliance to broadcast to Facebook Live (Facebook.com), the default, or to Workplace by Facebook (Facebook Workplace). Note that using your ClearCaster with Workplace by Facebook is by invitation only. Contact Wowza Support to request access. See How to configure Wowza ClearCaster to stream to Workplace by Facebook.
3. Configure the Capture Settings to use when two sources are connected to the ClearCaster appliance. See How to specify Wowza ClearCaster video input port monitoring and capture.
4. Configure the Audio Level for all broadcasts associated with the ClearCaster appliance. See How to change and view Wowza ClearCaster live stream audio level.
5. Configure the Output Aspect Ratio to use for all broadcasts. The default value is to match the live video source (Match Input Source), but you can also select Square (1:1), Standard (4:3), or Vertical (9:16). See How to create a Wowza ClearCaster square video stream for Facebook Live mobile feeds.
6. Configure the ClearCaster appliance to Broadcast at 60 frames per second (60 fps). This is ideal for high-motion content. Enabling this appliance-level setting makes 60 frames per second a configurable option for individual broadcasts. See How to stream Wowza ClearCaster high-motion video (Preview).
7. Configure the countdown duration, in seconds, when you go live. This countdown is displayed on the ClearCaster LCD screen and, if connected, the Talent View screen. See Monitor viewer engagement with Wowza ClearCaster Facebook streams.
8. Configure the layout of the Talent View screen for monitoring the broadcast. The default selection displays viewer comments as well as a small preview of the video broadcast. Alternatively, you can select full-screen video and only see user reactions and emojis.
9. Configure the Titling and Graphics to use for all broadcasts associated with the ClearCaster appliance. When a Vidpresso or Custom URL is provided, those graphics are applied to all broadcasts. If set to None, no default titling and graphics are applied to broadcasts, but you can add titling and graphics to individual broadcasts.
10. Configure the Audio Channel Mapping settings to use for all broadcasts associated with the ClearCaster appliance.
11. Send Logs to Wowza support if you need assistance.
12. Restart the ClearCaster appliance remotely.
Manage broadcasts
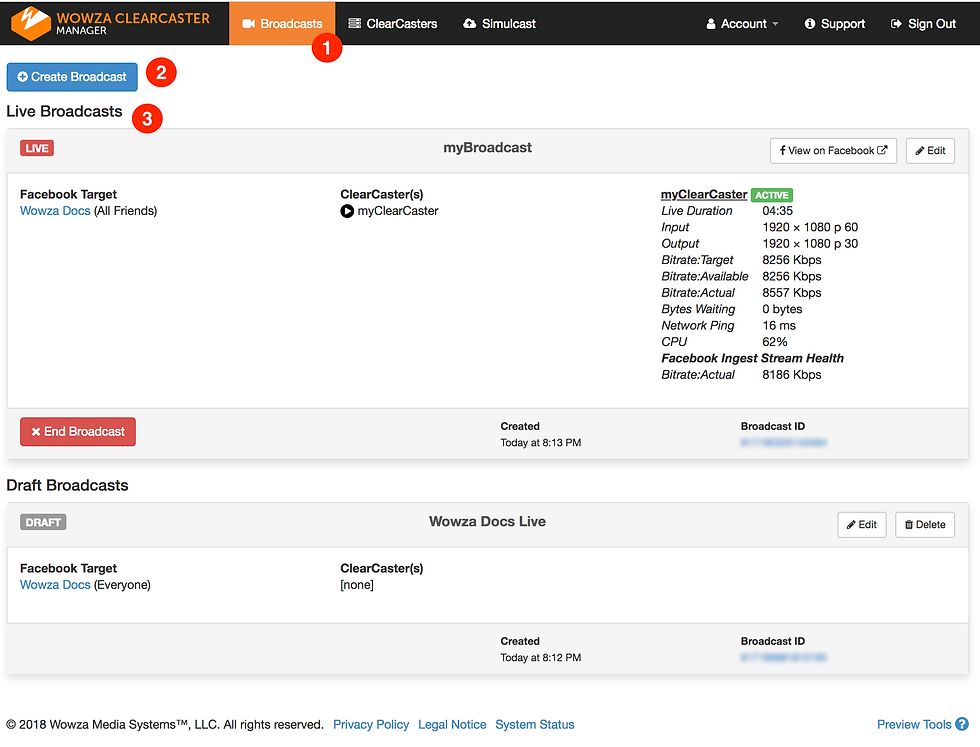
1. Use the Broadcasts tab to access a list of live, preview, and draft broadcasts associated with your Wowza and Facebook accounts. From this page, you can create new broadcasts, manage existing broadcasts, and monitor and end live broadcasts.
2. Click Create Broadcast to create a new broadcast. After specifying the Facebook destination and settings, you'll be taken to the broadcast details page where you can finish configuring your broadcast. See Create a Wowza ClearCaster broadcast for Facebook Live.
3. View a list of all broadcasts currently associated with your Wowza and Facebook accounts. The list organizes broadcasts in the following order: Live Broadcasts, Preview Broadcasts, Scheduled Broadcasts, and Draft Broadcasts. Placing live broadcasts at the top of the page makes it easy to monitor, modify, and end the broadcasts. Use this page to Edit all of your broadcasts. If you have any Preview or Scheduled broadcasts, you can Go Live from this page. If you've configured redundancy for your broadcast, you can also use this page to manually switch between the primary and redundant ClearCaster appliances. See Manage your Wowza ClearCaster broadcasts and Finish the Wowza ClearCaster broadcast.
Configure broadcasts
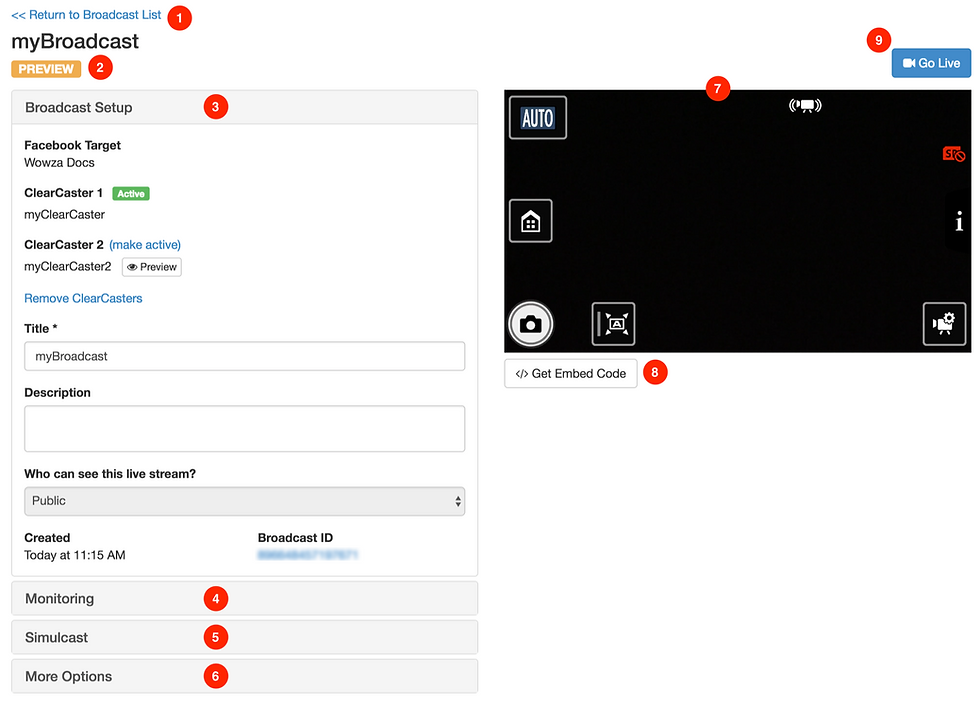
1. When you're finished configuring the broadcast, click Return to Broadcast List to return to the Broadcastpage.
2. View the status of your broadcast: Draft, Preview, or Live.
3. Use the Broadcast Setup tab to select the ClearCaster appliance to use and add a Title and Description for the broadcast. If you have more than one ClearCaster registered to your Wowza account, you can also select a backup ClearCaster to be used in case of a failure with the stream from your primary ClearCaster. See Set up redundant ClearCaster live streams for Facebook Live broadcasts. Note that a ClearCaster can't be associated with more than one broadcast at a time.
4. Use the Monitoring tab to view and monitor stream health metrics for the connected live video source. This tab is only visible when a broadcast is live or in preview. The associated ClearCaster must have a live video source connected. See Monitor Wowza ClearCaster live stream health.
5. Use the Simulcast tab to select a simulcast target as well as start and stop the target Wowza Streaming Cloud live stream. See Simulcast a Wowza ClearCaster Live Stream on Facebook Live and Wowza Streaming Cloud.
6. Use the More Options tab to configure a variety of other broadcast settings, such as adding tags, publishing as a continuous live broadcast, configuring broadcast-specific titling and graphics, and specifying the audio channels to use.
7. View a preview of the live video source connected to the ClearCaster appliance associated with the broadcast. This is only available for preview broadcasts. When you go live, the preview ends and is replaced with a link to the Facebook post so that you can verify that the broadcast is posted and playing correctly in Facebook.
8. If Allow embedding is enabled under the More Options tab, you can click Get Embed Code to generate the code needed to embed the live video broadcast on a webpage you manage.
9. Go Live is only available for Preview streams. The ClearCaster associated with the broadcast must have a live video source connected. After a broadcast is Live, the Go Live button is replaced with an End Broadcast button.
Manage simulcast targets

1. Use the Simulcast tab to access a list of Wowza Streaming Cloud live stream targets that are available to simultaneously broadcast (simulcast) to Facebook Live and Wowza Streaming Cloud. From this page, you can add new targets and delete existing targets.
2. Use the Wowza Streaming Cloud live stream's Connection Code to add new simulcast targets (Add Target). See Simulcast a Wowza ClearCaster Live Stream on Facebook Live and Wowza Streaming Cloud.
3. Delete Selected simulcast targets if any targets are selected in the list. See Manage your ClearCaster simulcast targets.
4. View a list of all simulcast targets that are available for simulcasting. Note that you must check the Simulcast tab on the broadcast details page or sign in to Wowza Streaming Cloud to see the status (started or stopped) of each simulcast target. The Wowza Streaming Cloud live streams will automatically stop after 20 minutes of inactivity. See Manage your ClearCaster simulcast targets.


Comments